


Arthur Lynch | Mon Jan 12 2026
Product photography lighting setup: Affordable Tips for Jewelry Photos
Your lighting setup is the single most important tool you have for turning casual online lookers into actual customers. When you get it right, the high-quality jewelry and accessories you've sourced look incredible, which means more sales, fewer returns, and a brand that people remember. It’s not about just making things bright; it's about making people want what they see.
Why Lighting Is Your Most Powerful Sales Tool
In the crowded world of e-commerce, your product photos do all the heavy lifting. They're your digital storefront, your 24/7 salesperson, and your brand's first impression, all at once. For any business selling jewelry, the pressure is even higher. You aren’t just selling an item; you’re selling sparkle, intricate detail, and a promise of quality. A great lighting setup is how you deliver on that promise.
Without good lighting, the facets of a gemstone look flat, polished silver looks dull, and the delicate details of a chain get lost in dark shadows. Customers can't pick up the pieces and feel the quality you've carefully sourced, so they have to trust what they see. Your lights are what create those visual cues, turning a simple object into something they have to own.

Connecting Light Quality to Business Growth
This isn’t just theory—the link between lighting and sales is real and measurable. Upgrading your lighting for more professional-looking images can boost conversion rates by up to 67% and slash return rates by 10%.
Think about that for a second. With 74% of online shoppers relying on product photos to make a purchase decision, the quality of your lighting is one of the most critical parts of their journey.
This is fundamentally about building trust. When a potential customer sees a piece of jewelry shot with crisp, clean, and accurate light, it sends a powerful message. It says you’re a professional who cares about quality, both in the products you sell and how you present them. That perception is what allows you to justify your prices and keeps people coming back.
The Psychology of Perceived Value
I like to think of lighting as the final, crucial step in the sourcing process. You’ve gone to the trouble of sourcing high-quality and affordable jewelry; now your lighting has to prove it to the world. The right light can easily make a $50 necklace look like it’s worth $150, simply by showing off its best features.
Perceived value is everything online. Soft, diffused light makes metal gleam without harsh, distracting reflections. A single, well-placed highlight can make a gemstone pop with life. This visual appeal is what convinces a casual browser to click "add to cart."
Improving your lighting isn't just a technical exercise; it's a direct investment in your business's bottom line. Here’s a quick breakdown of how specific changes can impact your sales.
Lighting Investment vs Business Impact
| Lighting Improvement | Potential Business Outcome | Relevance for Jewelry Sellers |
|---|---|---|
| Using Diffusers (Softboxes) | Reduced returns by ~10% due to accurate metal texture representation. | Eliminates harsh glare on silver and gold, showing true finish. |
| Adding a Backlight | Increased "add-to-cart" clicks by separating the product from the background. | Creates a halo effect on chains and pendants, making them stand out. |
| Color-Correct Bulbs (High CRI) | Lowered customer complaints about color not matching the photo. | Ensures gemstones and enamel look true-to-life, building trust. |
| Using Reflectors/Fill Cards | Higher perceived value, allowing for better pricing. | Brightens shadowy areas in complex pieces, showing every detail. |
As you can see, each small adjustment in how you light your products contributes directly to a better customer experience and stronger sales figures.
Ultimately, mastering your lighting is the core skill for any jewelry business that wants to stand out. It ensures the beautiful pieces you source are seen in their best light, helping you build a brand that customers trust and return to. This visual consistency is just as important as the displays in a physical store—for more on that, you might find our guide on creative retail display ideas helpful.
Building Your First Lighting Kit on a Budget
Putting together a great lighting setup for your product photos doesn't have to break the bank. If you're running a business built on sourcing affordable jewelry and accessories, the key isn't buying the most expensive gear—it's about making smart choices that give you control. Your goal is to create a consistent, repeatable environment so every piece looks its best, every single time.
Thankfully, getting your hands on good, affordable lighting is easier than ever. The global photography lighting market was worth around $4.3 billion in 2022 and is still growing. Much of that boom is thanks to LED technology, which is on track to claim over 50% of the market by 2026. What this means for your business is that powerful, color-accurate, and efficient LED lights are no longer just for high-end studios.
Key, Fill, and Backlight Explained
First things first, you need to understand what each light is supposed to do. Think of your setup like a little stage—each light has a specific role.
- Key Light: This is your star player. It's the main, and brightest, light source. You'll typically place it off to one side of the product to create the primary highlights and define its shape.
- Fill Light: Positioned on the opposite side, the fill light is less intense. Its only job is to soften the shadows thrown by the key light, bringing out details that would otherwise get lost in the dark.
- Backlight (or Rim Light): This one sits behind your product. It creates separation from the background and can add a gorgeous halo effect to a necklace chain or a crisp, sparkling edge to a gemstone.
A huge mistake I see beginners make is assuming they need three expensive lights right out of the gate. You can get a beautiful, professional two-light look with just one main light and a cheap reflector acting as your fill.
Continuous vs. Strobe Lighting
When you start shopping, you’ll see two main categories: continuous and strobe. For most jewelry sellers who need to shoot new inventory quickly and consistently, the choice is pretty clear.
Continuous lighting is exactly what it sounds like—the light stays on the whole time.
- What you see is what you get. You can move the light and instantly see how the highlights and shadows change on your piece. This makes adjustments incredibly fast and intuitive.
- It's beginner-friendly. There's no guesswork with flash triggers or power settings.
- It's ready for video. If you plan on shooting short clips for social media, continuous lights are a must.
Strobe lighting (also called flash) gives you a powerful burst of light only when you press the shutter.
- They pack more punch. Strobes can easily overpower any other light in the room, resulting in incredibly sharp, motion-freezing photos.
- There’s a steeper learning curve. It takes experience to visualize how the final shot will look, since you can't see the full effect until after you take the picture.
For the vast majority of jewelry sellers, continuous LED lighting is the way to go. The sheer ease of use and WYSIWYG approach will dramatically speed up your workflow, which is a lifesaver when you have dozens of new items to list. For more hands-on advice, check out our guide covering essential jewelry photography tips.
Gear-Agnostic Recommendations for Your First Kit
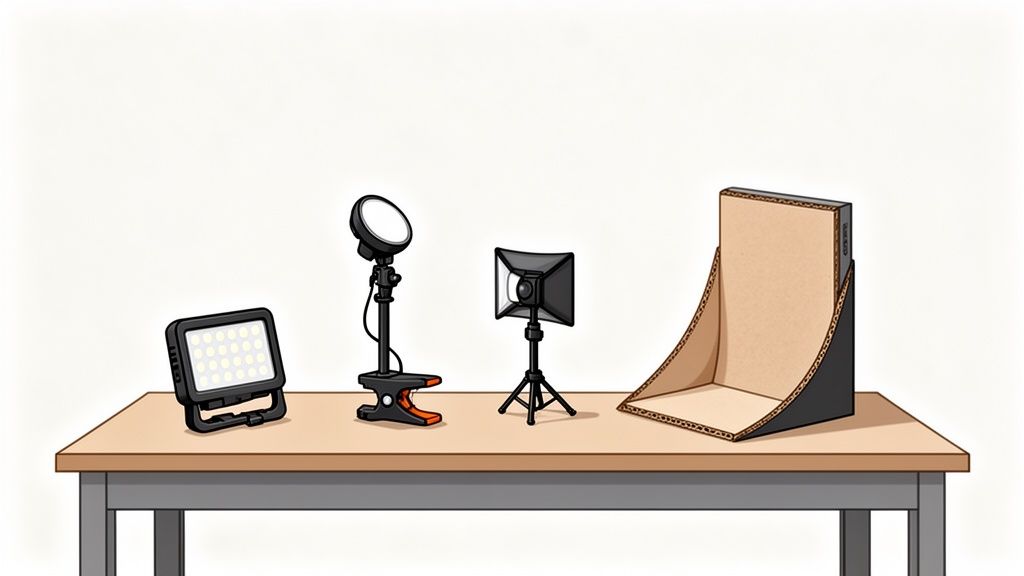
Don't get hung up on brand names. What matters is function. Here are the core pieces you'll need to build a versatile and effective kit, with options ranging from DIY hacks to budget-friendly buys that fit your business model.
1. Your Main Light (The Key Light)
Start with a single, dimmable LED panel. Look for one that's "bi-color" (meaning you can adjust the color temperature from warm to cool) and has a high Color Rendering Index (CRI) of 95+. This is critical for making sure the color of your metals and gemstones is accurate. Many affordable kits come packaged with a stand and a small softbox, which is a great starting point.
2. Your Shadow Control (The Fill)
You really don't need a second light to start. One of the most powerful tools in any product photographer's arsenal is a simple piece of white foam core from the craft store. Just prop it up opposite your main light, and it will bounce soft, beautiful light back into the shadows for you.
3. Light Modifiers
This is non-negotiable for jewelry. Even the best light source will create harsh, ugly hotspots on reflective metal without a modifier. A softbox or a diffusion panel is what you need. These go between your light and your product to soften and spread the light, creating those smooth, appealing gradients instead of distracting glare. If your LED panel didn't come with one, you can buy a standalone diffuser to clamp onto a stand.
How to Shape and Control Your Light
Just owning a powerful light isn’t the whole game. The real artistry in product photography, especially for tricky items like jewelry, comes from knowing how to shape and control that light. This is the skill that takes a snapshot with messy, distracting reflections and turns it into a polished, professional image worthy of your online store.
At its core, controlling light is about changing its quality. In photography, we talk about light being either hard or soft. Getting a feel for this difference is absolutely critical for making your products pop.
- Hard Light: Think of a bare light bulb or the direct sun on a clear day. The light source is small and intense, creating sharp, well-defined shadows and tiny, blindingly bright highlights. On a polished ring, this kind of light just creates distracting glare.
- Soft Light: Now picture a heavily overcast day. The clouds act as a massive natural diffuser, scattering the sunlight. This creates gentle, wrapping shadows with smooth, gradual transitions.
For jewelry, soft light is your best friend almost 100% of the time. It wraps beautifully around metal surfaces, minimizing harsh glare and letting the true color and fire of gemstones come through. It’s what gives your pieces that high-end, luxurious feel.
Using Modifiers to Make Your Light Soft
So how do you turn hard light into soft light? With modifiers. These are essential tools that go between your light source and your product. Their main job is to make your light source appear much larger from the perspective of your subject, which is what softens it.
The undisputed champion for jewelry photography is the softbox. It’s basically a fabric box with a white diffusion panel on the front that you mount to your light. It takes the focused beam from your flash or LED and spreads it out evenly, creating a beautiful, soft glow that looks like it's coming from a large window.
Another incredibly useful tool is a simple diffusion panel. This can be a dedicated piece of translucent fabric stretched over a frame, or you could even get creative with a sheer white curtain. Placing it between your light and your jewelry does the same thing as a softbox—it makes the light source bigger and softer.
Try this little experiment yourself. Shine a bare flashlight on a silver ring and notice the harsh, tiny hotspot it creates. Now, hold a single sheet of white printer paper between the flashlight and the ring. The hotspot disappears, replaced by a smooth, flattering gradient. That's diffusion in action.
The Art of Bouncing and Blocking
Once you've softened your main light, the next level of finesse comes from managing how that light moves around your scene. This is where you can use some surprisingly simple and cheap tools to fill in shadows or add a bit of drama.
Reflectors are anything you use to bounce light back onto your product. This is how you brighten up dark areas and make sure every little detail is visible. You don't need to spend a lot of money here; a quick trip to the craft store for foam core is all you need.
- White Foam Core: This is your workhorse. It bounces a soft, neutral light that gently fills in shadows without adding any unwanted color. It’s perfect for lifting the shadows on the underside of a ring or illuminating the intricate links of a chain.
- Silver Reflector: A silver surface bounces a harder, more intense light. I use this when I want to add a crisp little "pop" or a sharp highlight to a specific gemstone facet to really make it sparkle. Use it with a light touch, though, as it can be overpowering.
- Gold Reflector: As you'd expect, this bounces a warm, golden light. It’s fantastic for adding richness to yellow gold jewelry, but keep it far away from silver, platinum, or white gold, as it will give them an ugly, yellowish tint.
Flags, on the other hand, do the opposite—they block light. Your best friend here is a simple piece of black foam core. It absorbs light, preventing it from bouncing around and killing shadows you actually want to keep for a sense of depth and dimension. For instance, placing a black card just out of frame next to a highly polished silver bracelet can create a clean, dark line in the reflection that perfectly defines its curve and shape.
Practical Lighting Recipes for Different Jewelry Types
Theory is great, but getting your hands dirty and actually setting up the lights is where the real magic happens. Every piece of jewelry is different—a ring throws reflections in a totally unique way compared to a sprawling necklace, and earrings need their own special touch to truly shine.
So, let's move past the abstract and get into specific, actionable lighting recipes you can try right away.
When you start looking at gear, you’ll find plenty of options. For jewelry, I’ve seen pros use everything from a single, dramatic light to more complex three-point setups. A simple one-light configuration is fantastic for creating moody, high-impact shots of a single piece and is incredibly friendly on the wallet for smaller sellers. On the other hand, multiple lights give you granular control over every shadow and highlight. Lightboxes are also a popular route, as they create incredibly even light that’s perfect for capturing intricate details, a point echoed in market analysis from sources like Verified Market Research.
The core idea, no matter your gear, is to shape the light.
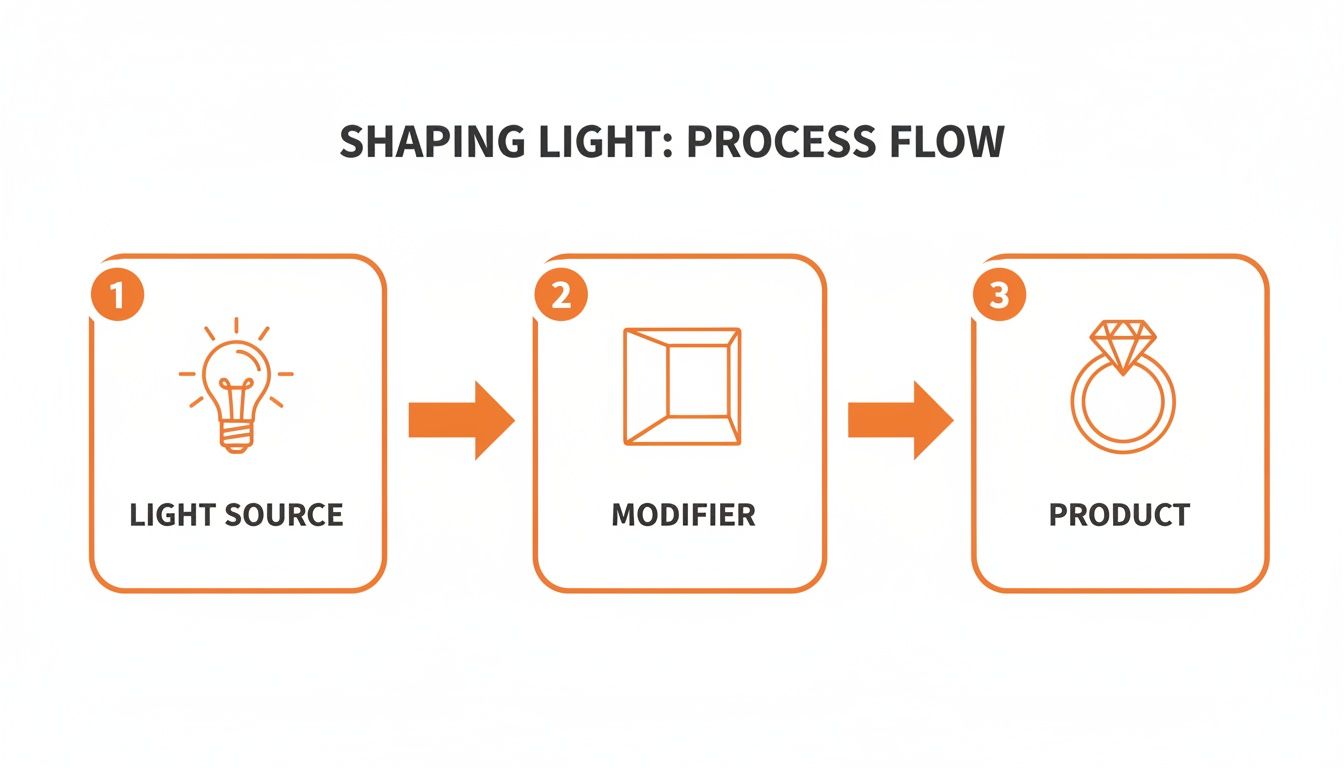
This process is simple: your light source is your raw ingredient. The modifier—like a softbox or diffusion panel—is what transforms that harsh glare into the soft, flattering light that makes jewelry look incredible.
The Single Ring Setup
Photographing a single ring is a balancing act. You need to capture the fiery sparkle of the gemstone while keeping the metal band looking smooth and polished. The number one enemy here is glare.
My go-to approach uses just one key light fitted with a large softbox. I position it high and to the side, at about the 10 o'clock position. This large, soft source wraps a gentle gradient of light around the band, which avoids those ugly, distracting hotspots.
But what about the gem? To make it pop, I bring in a small silver reflector card just out of the frame, opposite the light. By angling it just right, I can bounce a crisp, sharp highlight directly into the stone's facets. This little trick is what creates that brilliant, eye-catching sparkle.
Pro Tip: Place a small piece of black foam core just behind the ring, facing the camera. This adds a clean, dark reflection to the front of the band. It seems counterintuitive, but this contrast actually makes the metal look more defined, sleek, and expensive.
For my camera settings, I’ll start with a deep aperture like f/11 or f/16 to ensure the entire ring is tack sharp from front to back. I always lock my ISO at 100 to get the cleanest image possible, then I just adjust the shutter speed until my exposure is perfect.
The Dangling Earrings Setup
With dangling earrings, the goal is to make them look elegant, crisp, and almost like they're floating in mid-air. The lighting has to be incredibly even to prevent one part of the earring from blowing out while another gets lost in shadow. This is a perfect job for a two-light setup.
I place two softboxes on either side of the earrings, each at about a 45-degree angle (think 10 o'clock and 2 o'clock). This classic "clamshell" lighting bathes the product in soft light from both sides, canceling out almost all of the harsh, distracting shadows.
To get that floating effect, I hang the earrings from a very thin piece of fishing line against a pure white background. The even lighting makes it easy to blow out the background to pure white, which in turn makes removing that tiny fishing line in post-production a breeze.
Settings-wise, I can usually open up my aperture a bit to around f/8, since the depth of field isn't quite as critical here. And as always, ISO 100 is non-negotiable, with the shutter speed set to get a bright, clean shot.
The Intricate Necklace Setup
Necklaces, especially when styled on a bust, are probably the most complex pieces to light. They're large, have all kinds of curves, and can easily cast unflattering shadows on themselves or the display form. The solution is to create a light source that is broad, soft, and all-encompassing.
For this, a single, very large overhead light source is your best friend. I'll position a big softbox or octabox directly above and slightly in front of the necklace. This setup mimics the soft, flattering light of an overcast sky, letting the light fall naturally over every curve of the jewelry and the bust.
Of course, a top-down light will create some shadows underneath the pendant or in the chain links. To fix that, I'll place a large white reflector on the table, just in front of the bust. This bounces the overhead light right back up, gently filling in any dark spots and ensuring the entire piece is bright and full of detail.
My camera settings for this shot are similar to the ring setup: a deep aperture like f/11 or f/16 to keep the whole necklace in focus, ISO 100 for quality, and a shutter speed dialed in for a perfect exposure.
Quick Lighting Recipes for Popular Jewelry
To get you started even faster, I've put together a quick reference table. Think of these as proven starting points—you can and should adjust them to fit your specific piece and creative vision.
| Jewelry Type | Recommended Light Setup | Key Modifier | Pro Tip |
|---|---|---|---|
| Ring | Single key light from above/side (10 o'clock position) | Large Softbox | Use a small black card opposite the camera to create a defining reflection on the band. |
| Earrings | Two lights, one on each side (10 & 2 o'clock) | Two matching Softboxes | Hang earrings with fishing line against a white background for a "floating" look. |
| Necklace | Single, large overhead light | Large Softbox or Octabox | Place a large white reflector below the bust to bounce light up and fill in shadows. |
| Watch | Two strip softboxes from the sides | Strip Softboxes | Use a circular polarizer on your lens to control reflections on the watch face. |
| Gemstone | Hard light source (bare bulb) from behind | N/A (or a snoot) | Backlighting the stone can make its color and internal characteristics "glow." |
Remember, these are just recipes. The best photographers know when to follow them and when to break the rules to create something truly unique. Don't be afraid to experiment
Solving Common Jewelry Lighting Problems
Even with a perfect lighting setup on paper, shooting something as reflective and intricate as jewelry will throw a few curveballs your way. You'll inevitably run into frustrating glare, colors that look off, and shadows that just won't cooperate. Think of this as your troubleshooting guide for those all-too-common headaches.
Instead of getting stuck, I've learned to see these issues as simple puzzles. Every problem has a logical cause, which means it also has a straightforward fix—usually just a small tweak to your light, camera, or the piece itself. Let's walk through how to solve them.
Managing Harsh Glare and Hotspots
You know that blindingly bright spot on a polished silver band that erases all the detail? That’s a specular highlight, or what we all just call glare. It's the result of a hard, direct light source bouncing straight into your camera lens.
Your goal is to make the light source look much larger and softer from the jewelry's perspective. Here’s how:
- Soften Up: Move your softbox or diffusion panel closer to the jewelry. The closer the diffuser, the softer the light wraps around the piece, turning that harsh spot into a smooth, attractive gradient.
- Change Your Angle: Sometimes, the fix is as simple as shifting things a few inches. Nudge your light, move your camera, or slightly rotate the jewelry. This alters the angle of reflection and can often move that hotspot right out of the picture.
- Use a Light Tent: For super-reflective items that seem impossible to shoot, a light tent is a lifesaver. It completely surrounds the piece with diffused light, killing harsh reflections from every direction.
Achieving True-to-Life Metal and Gemstone Colors
Have you ever photographed a gorgeous 18k gold ring only to have it look like a pale, washed-out yellow on screen? Or watched a brilliant sapphire turn dull and dark? This is almost always a white balance problem, which means your camera is misreading the color temperature of your lights.
Getting this right is crucial. When customers trust that what they see online is what they’ll get, they’re more likely to buy.
Getting color right starts with your light source. Using lights with a high Color Rendering Index (CRI) of 95+ is non-negotiable for accurate product photography. These bulbs are designed to reveal colors just as they would appear under natural daylight.
Once your lighting is solid, you need to tell your camera what "true white" looks like in your setup. Don't just leave it on "Auto." The best way is to set a custom white balance using a grey card or even just a photo of your pure white backdrop under your lights. This gives the camera a perfect reference point, ensuring all other colors render accurately.
Eliminating Unwanted Color Casts
So, you've nailed the white balance, but your photos still have a weird blue or orange tint? You're probably dealing with light contamination. This happens when ambient light from a window or an overhead room light sneaks in and mixes with your dedicated studio lights.
Your camera gets confused trying to process multiple color temperatures at once, and the result is a color cast that can make silver look bluish or gold look muddy.
The fix is pretty direct: control your environment.
- Kill all other lights in the room.
- Close the blinds and curtains to block any daylight.
- Your shooting area should only be lit by your dedicated photography lights.
Creating this "light bubble" forces your camera to read just one consistent light source, giving you clean, pure colors every time. And of course, make sure the jewelry itself is sparkling before you even start. Our guide on how to clean tarnished jewelry has some great tips for pre-shoot prep.
Creating a Pure White Background In-Camera
Getting a crisp, 100% white background straight out of the camera is one of the biggest time-savers for e-commerce photography. The secret isn't just lighting your product—you have to light your background separately and make it much brighter.
Here’s the setup: one light is aimed at your product, and a second, more powerful light is aimed only at the white backdrop behind it. By intentionally overexposing the background until it's significantly brighter than the jewelry, you can make it render as pure white in the photo.
You can confirm this with your camera's histogram; a perfectly "blown out" white background will show a sharp spike on the far right edge of the graph. This technique saves countless hours of tedious editing and keeps your product listings looking clean and consistent. If you're looking for more advanced tools or AI-powered help for photography challenges, the auralumeai homepage might have some interesting solutions to explore.
Common Questions About Lighting for Jewelry Photography
Even with a solid guide, you're bound to run into specific questions once you start setting up your lights. This is where the real learning happens. Let's tackle some of the most common hurdles I see jewelry sellers face, with practical answers to get you over the hump.
Can I Get Away With Just Using Natural Window Light?
In a word? No. While a soft, north-facing window can produce some beautiful light, it's a huge liability for an e-commerce store. The problem is consistency—or the complete lack of it.
The color and brightness of window light change constantly with the time of day, the weather, and the season. One minute you have cool, bright light, and the next, a cloud rolls in and everything turns gray and dim.
This makes it impossible to build a uniform catalog. Your photos from Tuesday will look completely different from your photos on Wednesday, which undermines the professional look you're going for. Artificial light is about one thing: control. It gives you the power to get the exact same shot at 10 AM or 10 PM, which is non-negotiable for a serious business.
I'm on a Tight Budget. What's the Best Single Light to Buy?
If you can only spring for one light, get yourself a decent LED panel with adjustable brightness and color temperature. Look for a kit that comes with a small softbox or at least a built-in diffuser panel. This will be your workhorse, your key light.
So how do you get that polished, multi-light look? You fake it. Head to a craft store and buy a cheap white foam core board. Prop it up just out of frame, opposite your LED panel, and you’ve just created a bounce reflector. It will kick soft, clean light back into the shadows, making the piece pop.
This simple, two-piece setup—one light and one reflector—is all you really need to get professional results. It’s a perfect example of how smart technique will always beat expensive gear.
How Do I Stop Seeing My Reflection in the Jewelry?
Ah, the classic problem. Reflections are the biggest headache in jewelry photography, but they’re manageable once you stop trying to eliminate them and start trying to control what they reflect.
First, your light source needs to be big and soft. A softbox is perfect because it creates a large, white highlight that looks like a beautiful, smooth gradient on a ring band, not a harsh, distracting reflection of a bare lightbulb.
Next, play with your camera angle. Sometimes, moving just a few inches left or right is all it takes to make your reflection disappear. For really tough pieces, you can build a simple "cone" or "tent" out of white paper, surrounding the jewelry and leaving just a small hole for your camera lens. This way, the only thing the piece can reflect is a clean, neutral white surface.
Do I Really Need an Expensive Camera?
Not at all. I can't stress this enough: your lighting is 100 times more important than your camera. A brand-new iPhone, paired with a great lighting setup, will produce better results for your online store than a $5,000 camera with poor lighting.
A fancy DSLR or mirrorless camera gives you more manual control, especially over things like aperture (for depth of field), but that's a secondary concern. The things that truly make a jewelry photo look professional—soft light, accurate colors, and controlled highlights—are all products of your lighting, not your camera. Spend your money on good lights first.
At JewelryBuyDirect, we know that amazing product photos begin with amazing products. We focus on providing high-quality, on-trend inventory so you can focus on making it shine. With over 120,000 styles and no minimum order, our factory-direct pricing is designed to help your business grow. Find your next bestseller with us today.